Poha by Ankitha Gadag

Poha is a traditional South Indian breakfast made with minimal ingredients. The ayurvedic turmeric gives it a beautiful golden color while the warmed cumin adds a depth of flavor.

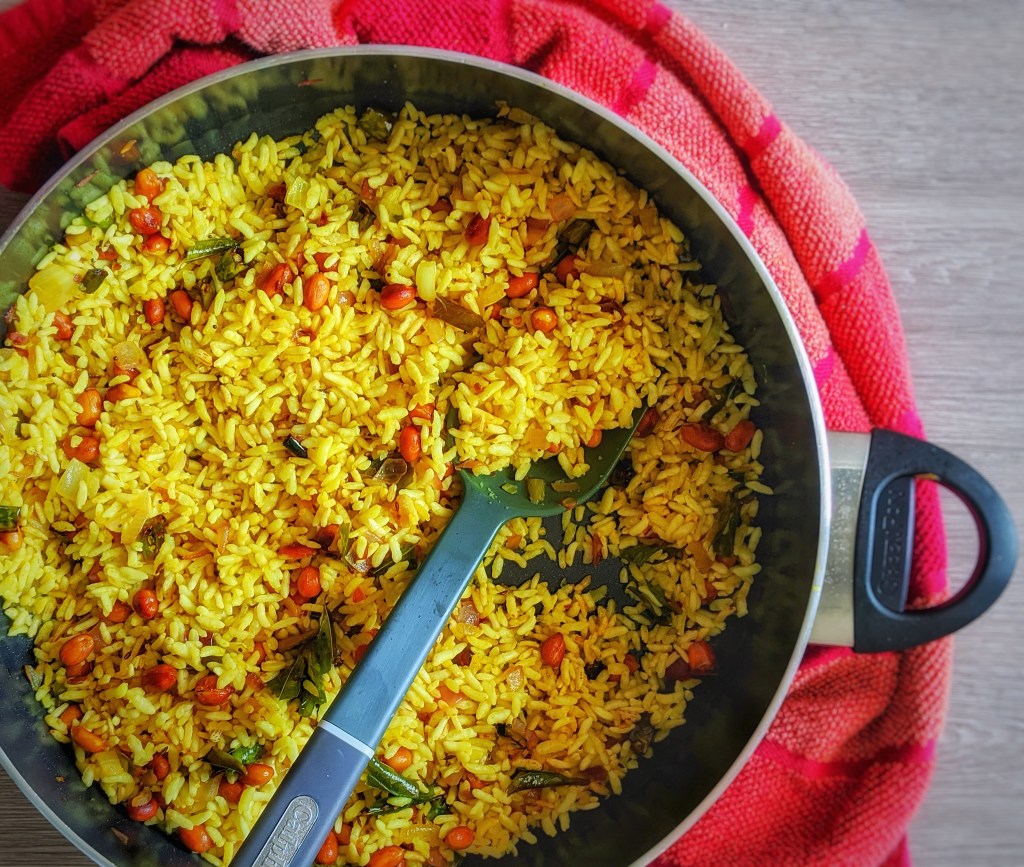
While Poha goes by a variety of names in South India (Pohay, Chuda Santula, Kande Pohey, Avalakki, etc), the ingredients and flavor profile tend to be the same across the board. In it’s essence, Poha is a spicy rice dish with peanuts that is best served with a piping hot cup of masala chai (mmmm…).

This dish takes me back to my Aunt’s home in Davengere, Karnataka. She is an incredible cook who loves to feed everyone around her. This was one of my favorite dishes to eat around an evening snack-time (although traditionally eaten during breakfast). Today, this dish is something I serve to my friends during a weekend brunch, just so they can experience some of my favorite foods growing up 🙂

Without further adieu, let’s get started!


You’ll need:

Please note: These items can all be found in your local Asian-Indian grocery store

  1. Poha ( Puffed Rice – this one is my favorite) : about 4 cups
  2. Thai green chillies or serranos ( depending on your spice level, I use 4-5 green TC, use less for serranos) : Roughly chopped
  3. Dry, Unsalted Peanuts: 1/4 cup
  4. Mustard seeds: 1 tsp
  5. Cumin seeds: 1 tsp
  6. Onion: 1/2 fine diced
  7. Hing (asofetida) : 1/2 tsp
  8. Turmeric: 1 tsp
  9. Curry Leaves: ~10 leaves torn
  10. Squirt of lemon juice (optional)
  11. Aloo bujia (optional)

To get started:

  1. Start by soaking the poha in a colander with cold water. This helps the texture of the dish go from crunchy to a chewy consistency.
  2. In a shallow pan, warm up roughly two tablespoons of ghee. (Any form of oil you have on hand can be used, but ghee makes a difference in flavor)
  3. In low heat, start by tempering the mustard seeds and cumin seeds. Once they start popping, add in your chilies, curry leaves and saute for a couple of mins.
  4. Next, change the heat setting to medium-high, and add in the peanuts. The trick here is to roast the peanuts without burning them, so watch carefully.
  5. Now, add in your onions, turmeric and hing. Reduce heat to medium and let cook for 4 – 5 mins until golden brown.
  6. Salt your drained poha (to taste) and add in to the mixture. Turn off stove. Top of with lemon juice and combine.
  7. Enjoy! I love to serve this dish with aloo bujia. This crispy potato snack makes a huge difference so highly recommend!

Ankitha Gadag Original Recipe – Mirchi Bajji

A South Indian soul-food, complete with a step by step video tutorial!

Okay, so I lied.

This actually is NOT an Ankitha Gadag original recipe. It is actually passed down from generations within the Gadag family clan. So thank you Mama for sharing the recipe!

Admittedly, this is not the healthiest of recipes…  but trust me it’s worth the indulgence. There is a series of Indian “street foods” that are worth every calorie. Amongst them, a few of my favorites are: Panipuri, Bhelpuri, Samosas, and of course Mirchi Bajjis!

In the Gadag household, this is a regular treat on a rainy evening or when the whole family craves “junk” food. It’s a time for everyone to come together, throw on a 4 hour Bollywood movie, grab a glass of wine and share some mirchi bajji’s with bhel on the side.

From my family to yours, I hope you enjoy this 🙂


What you’ll need:

  • jalapenos (1 serving : 5)
  • thyme seeds (1-2 tbsp)
  • cumin seeds (1-2 tbsp)
  • Bob’s Red Mill Garbanzo Flour (1 cup)
  • Chosen Foods Avocado Oil (1 cup)
  • warm water (1-2 tbsp)
  • s&p to taste

Method:

  1. Start by slitting a vertical line through each of the jalapenos. De-seed for less spice
  2. Stuff with Thyme seeds + Cumin Seeds
  3. To make your batter , combine the remainder of cumin seeds, thyme seeds with the garbanzo flour. Add salt to taste. Add a couple tablespoons of the heated oil and WHISK away!
  4. Add in a couple tablespoons of warm water. You want to have a fairly thick consistency so the batter will hold in the oil
  5. Dip your stuffed jalapenos into the batter and fry until golden brown
  6. Serve HOT!


Smoked salmon stuffed Curd rice – Ankitha Gadag Recipes

A fusion of South Indian and Mediterranean Cuisine!

At Ankitha Gadag Recipes, we love putting spins on traditional flavors. What happens when you take two exotic cuisines and combine them in a plate? Flavor BOMB people, that’s what. Here we have a traditional smoked salmon dish with capers that one would consider very Mediterranean combined with South Indian yogurt rice or fondly known as “curd rice.” Check out the recipe below at one of my favorite blogger’s site!


Curd rice/ Thayir sadam is more often eaten by the south Indians as a part of meal. Rice and yogurt are the 2 main ingredients that go towards making this. It is called as thayir sadam in kerala. Yogurt rice can be made in different ways. I am sharing this with bit of fusion of…Read…

via Smoked salmon stuffed Curd rice / Thayir saadam. — keralaslive

Ankitha Gadag ‘s home-made spicy chili from scratch!

Ankitha Gadag shares an original recipe for a savory delicious chili…with an exotic twist!

I don’t know about you guys but I love a week-night meal that keeps on giving. Giving heartiness, nourishment, warmth, fulfillment… what I call healthy soul-food. A delectable meal that gets prepared in a batch-style quantity, yet you don’t get bored of it two meals later. That is precisely what this savory spicy chili is.

I used ground beef (85% lean) for this recipe, but feel free to use whatever protein floats your  boat. If you are health conscious and looking for a protein dense meal, use bison. If you want a more melt-in-your-mouth chili, use a less lean version of beef/pork/turkey.  If you’re trying to keep it vegetarian, try using Tofu crumbles, Tempeh crumbles, Seitan, or even just red beans. Make the recipe YOURS!!! 🙂

OK, let’s get started…


You will need:

  • 2 carrots (chopped)
  • 2 celery sticks (chopped)
  • 1/2 onion
  • 1-3 green chillies (1 = mild; 3 = spicy)
  • 1 cup veggies of your choice (I used mushrooms & bell peppers)
  • 1 lb protein of your choice (ground beef, turkey, red beans, tempeh, tofu, other)
  • 2 cloves garlic
  • bay leaf
  • 1 tbsp cumin powder
  • 1 tbsp garam masala
  • 2 tbsp chili powder
  • 3-4 cloves
  • salt & pepper
  • *optional: 1 tbsp smoked paprika
  • *optional: 1 can garbanzo beansankitha_gadag_veggies

To prepare:

  1. Start by chopping all your veggies in bite size pieces
  2. Saute the onion and garlic in about 1 tbsp of oil of your choice. Pro-tip: Add salt here, it makes the onion lose it’s water content to cook it faster.
  3. Add in the rest of your veggies
  4. Add in your seasonings. Cover and let it cook for about 10 mins.ankithagadag
  5. Now add in your protein
  6. Add in some water or broth and let it simmah simmah.
  7. Enjoy in about a half hr to an hr!

Let me know how you enjoyed this recipe. Thank you for reading! P.S- this tastes great with some crumbled tortilla chips or avocado and toast!

Ankitha Gadag

Hyderabadi Achari Murgh Recipe – (Pickled Chicken Curry)

Spicy Hyderabadi Chicken Curry with tangy pickling spices

Okay guys, so this curry is truly a GEM and an Ankitha Gadag original recipe. I promise you, reactions will be nothing short of jaws-dropping if you decide to put in the work to give this a try!

For one, this recipe has taken a few weeks to perfect. I was first inspired to re-create this curry after tasting the most amazing Achari Chicken Curry at a local Hyderabadi restaurant. It was unlike anything I ever tried before – it was tangy, it was spicy, truly tantalizing your taste buds in every way. Of course I had to dig further and put my skills to the test.

Turns out Achari (Pickle) Murgh (Chicken) Curry actually originated in the Northern region of India (Punjab). Pickling of mangoes, limes and other vegetables would require a variety of spices all batched together for pickling. So, what do you do with the leftover spices? Make curry,  of course!

This curry has now been modified to fit South Indian taste buds (a.k.a – made spicier). Don’t fear, the heat is so well balanced with the unique flavors from the kalonji (onion seeds), fenugreek, and yogurt 🙂

ankitha-gadag-marinade-achari

On to the recipe!

You will need:

  • 1 cup curry leaves
  • 4 lbs chicken thighs
  • 10 thai chillies
  • 3-4 dried red chillies
  • 2 bay leaves
  • 3 onions chopped
  • Ginger-garlic paste (4 tbsp)
  • Kalonji (onion seeds)- 1 tbsp
  • Methi (fenugreek) seeds- 1 tbsp
  • Jeera (cumin seeds)- 1 tbsp
  • Saunf (fennel) seeds- 1/2 tbsp
  • Tomatoes- 2 (finely chopped)
  • Yogurt- 1/2 cup
  • Lemon juice- 2tbsp
  • Turmeric powder- 1tsp
  • Red chilli powder- 1 tbsp
  • Mustard seed oil – 1/4th cup
  • Pickling spices  – (you can get a pre-packaged packet of this) – 4 tbsp
  • Mango Pickles – (1 tbsp)

Phew, that’s a handful, yea?

Method:

  1. Start by marinating the chicken, you can marinate as long as 12 hrs or as short as 2. Add lemon juice, chillies, half of curry leaves, red chilli powder, turmeric powder, half of pickling spices, salt, yogurt, and mustard seed oil  to the chicken. Mix and set aside.achari-chicken-curry
  2. In some oil (about half cup), add the onions and fry until they are translucent. Add in curry leaves, dried red chilies, bay leaves, cumin seeds, fenugreek seeds, kalonji, and ginger garlic paste.ankitha-gadag-achari-chicken.jpg
  3. Add in the tomatoes and any remaining spices. Mix into the spices until soft.
  4. Add in the marinated chicken and cover on low-medium heat for about 30 mins
  5. The water from the chicken and yogurt should have formed a gravy. At this point add in the mango pickle.
  6. Stir and cover for an additional 30 mins
  7. Warm up some hot naan or some basmati rice and Serve!!ankitha-gadag-achari-chicken-curry-meal

Thanks for checking out my recipe. Let me know how you liked it!

-Ankitha Gadag

Hyderabadi Chicken Biryani

I first became obsessed with Chicken Biryani when I first visited Hyderabad in the summer of 2014.

The spices, the aroma, the flavors… were incomparable to anything I expected or tasted in the US. I vividly remember my first thoughts being – if I were to be trapped on a deserted island for the rest of my life, I might be okay if I had an endless supply of this delicious biryani.

After that out of the world experience, I did everything in my power to recreate the taste at home. After visiting endless biryani restaurants including: Paradise BiryaniBiryani PotAsiana’s, etc, and after countless trial and errors with various recipes; I believe I have mastered the art of biryani.

Now, to the recipe…

Ingredients:

  • 2 Onions
  • 10-20 Chillies (thai chillies work best)
  • Shan – Ginger Garlic Paste – 26 oz (use about 1/4th of bottle)
  • 1-2 Tomatoes
  • Basmati Rice (Long grain) (4 cups)
  • Chicken (I prefer dark meat, bone-in) (3 lbs)
  • Yogurt
  • Lemon/Limes
  • mint
Spices:
  • Shan, Mix Seasoning Biryani Masala, 1.75-Ounce (Pack of 4) (Use 1/2 of 1 box)
  • cloves (5)
  • cardomom (3-4)
  • bay leaf (1-2)
  • anise (1-2)
  • black cardomom (3)
  • mase (1 tbsp)
  • red chilli powder (4-5 tbsp)
  • garam masala (4-5 tbsp)
  • saffron (7-8 strands)
  • shah jeera (1 tbsp)
  • cumin seeds (1tbsp)
  • cinnamon sticks (3)
* You will also need a large tray for baking the biryani
Method:

  1. Marinate chicken overnight with yogurt, salt, lemon, and red chilli powder
  2. Slice onions thin and length-wise. Fry in oil until brown and crispy. Remove and set aside by soaking in paper towels
  3. Use the remainder oil to add the following spices: (cloves, cardomom, bay leaf, anise, black cardomom, mase, shah jeera, cumin seeds, cinnamon sticks)
  4. Once fragrant, add in the tomatoes, chillies and girnger/garlic paste
  5. Now, add in the garam masala
  6. After stirring a few mins, add in the marinated chicken
  7. Now, add in the Shan Biryani Masala
  8. Stir and cover with a lid over medium-low heat. This will need to cook for an hr or so. The longer it cooks, the more tender the meat will be
  9. Soak the basmati rice in cool water after flushing about 3-4 times
  10. Boil around 6 cups of water for the 4 cups of rice, Add in the rice. Heat uncovered until the first boil appears within the first 10-15 mins.
  11. Use the tray and line the first layer with gravy and chicken from earlier. Now add a layer on top with the semi- cooked rice. Top with garnish of mint and the fried onion from earlier
  12. Continue with step 11 until the tray is full
  13. Soak the saffron layers in warm milk for a couple mins. Garnish this dilution over the top of the biryani
  14. Cover the tray with aluminum foil and bake at 350 degrees for 20-25 mins.
  15. Enjoy!
I know what you’re thinking. This is a lot of work. BUT trust me when I say it is WORTH IT!!!
Andddd, it will last you atleast a week (assuming you can stop inhaling this delicious goodness :P)
%d bloggers like this: